Making of Moana (the ShaderToy)
I always loved the water rendering in Moana so I set out to make a ShaderToy that would recreate some semblance of it in ShaderToy. It took a whole bunch of tricks to get it where I wanted, this post will break down some of the major ones. The ShaderToy source is available here.
I’ll first give a brief intro to the physics behind some key elements of water: absorption, refraction, and reflection. I’ll go into the distinction between ray marching and ray tracing. Both were necessary to get the whole effect but there’s some key performance and visual differences.
The second half will go over some of the secondary environment effects including the sand and the sky and a couple of tricks to add believability while staying real-time-ish.
Part 1: Water
Properties of water
In order to render water there’s 3 important things that need to be nailed down:
- Reflection
- Refraction
- Absorption
To show how that all looks in this particular scene, here’s a diagram sloppily drawn in, of all things, Microsoft Word (sorry):
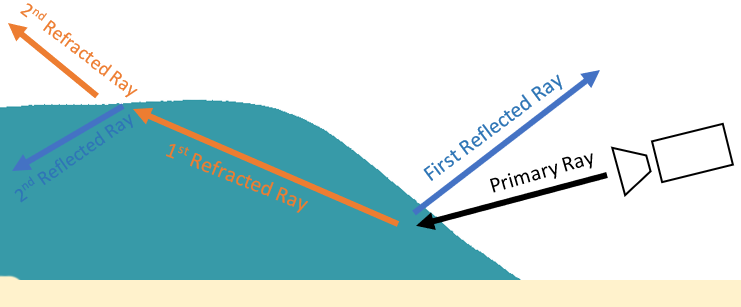
In total, that means we have a total of 5 rays per pixel: 1 primary camera ray, 2 reflected rays, and 2 refracted rays. And some of the that involves ray-marching to handle absorption correctly. Needless to say, the brute-force implementation is going to be too slow. So here’s a couple of some very scene-specific optimizations I made to make this affordable:
- The shape of the water makes it almost a certainty that the first reflected ray and second refracted ray will hit the sky. So don’t bother checking geometry here, just assume that ray is going towards the sky.
- The second reflected ray is similarly almost guaranteed to hit the ground. So only do intersections against opaque geometry. This is a big deal because in this particular scene, tracing against opaque geometry is significantly faster than the water, details on this in the next section.
Ray Marching vs Ray Tracing
At this point, I need to delve into something that’s was important for performance, the distinction between ray tracing and ray marching. I use both in the shader, relying on ray marching for the water volume and ray tracing for the rest of the opaque objects (coral and sand). If you’re already aware of the difference, then you can skip all of this, but if not, read on! The TLDR; of it is that ray tracing is faster but only works with boring shapes (triangles/spheres/etc), ray marching works on all sorts of fun SDFs but is iterative and slower. Keep in mind this is in the context of my ShaderToy, in different contexts there’s different trade-offs.
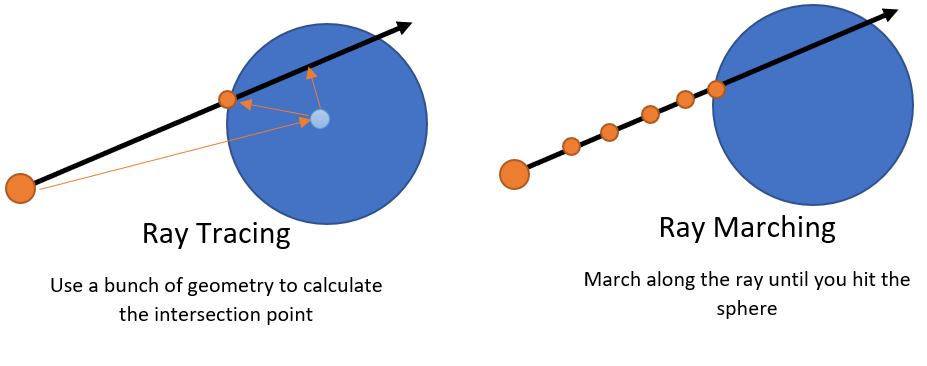
Lets talk about ray tracing. Ray tracing is a bit of a overloaded term, but in this context I use it to mean analytically determining intersection between a ray and some geometry. What’s that mean? Well lets take the example of a sphere and a ray. Using math you can calculate exactly if the ray will hit that sphere and exactly where. The great part is that math doesn’t involve any iteration. So what that means is that regardless of where your ray is, where or how far away the sphere is, you will ALWAYS be able to calculate the intersection position (or lack thereof) with a few math operations. And this applies not just to spheres but several other shapes including boxes, triangles, etc. In terms of performance, this is GREAT because we know exactly what we’re paying for. If you’re coming from a rasterization background, you might be puzzled to hear that ray tracing is “fast”. Keep in mind, that we’re just talking about a single primitive, once you start talking about things like triangle meshes where there’s thousands upon thousands of triangles, things get different. Let’s not go there today. In my ShaderToy, I had 6 primitives total (5 spheres and 1 plane).
So what about ray marching? Ray marching is a little different, particularly with signed distance fields (SDF). The marching is an iterative process based on the SDF. What that means is that it’s iteractive and that performance WILL change based on your SDF and the position of your sphere. So why do ray marching if it’s so much slower? The main reason you’ll see it on something like ShaderToy is because it’s extremely malleble and allows you to create interesting shapes programmatically. Anything from Inigo Quilez is a great example of this. Another example of this in something that’s actually shipped is Dreams, there’s a very cool talk on their architecture here.
There’s also a second reason to ray march. For something volumetric like water, you need to ray march anyways to get proper volumetric lighting. If we have to march ANYWAYS, we might as well use an SDF where we can get some fun shapes out of it.
Water
Modelling
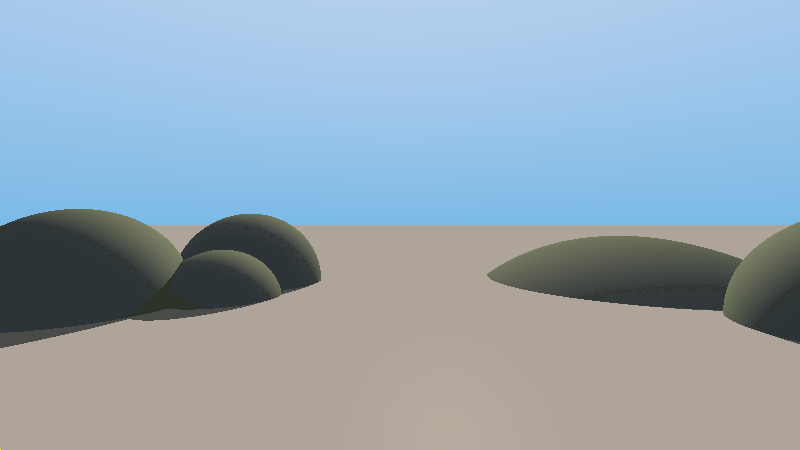
I modelled all of the opaque geometry (anything that isn’t water) using primitive shapes. Not SDFs but just spheres for the coral and a single plane for the sand. This was important for performance because intersection testing could be done fast using ray tracing. It looks terrible right now but bear with me, it will look better by the end!
The actual water was created by bashing a bunch of SDFs. I won’t go in detail on the technical details but if you’re interested, you can check out my post on making a cloud volume with SDFs. The quick and dirty of the water is a few sine waves, some noise for add faked turbulance, and then I subtract out a sphere where the camera is to make the parting of the ocean. There’s nothing fancy happening there, just techniques from IQ’s sdf page.
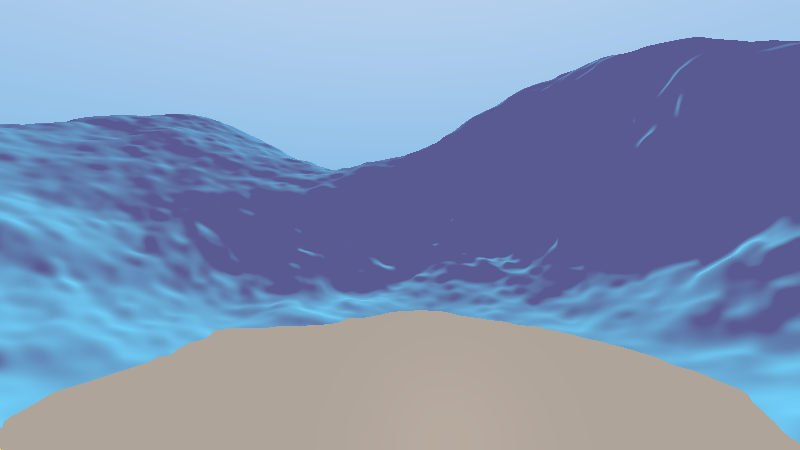
Absorption & Volumetric Lighting
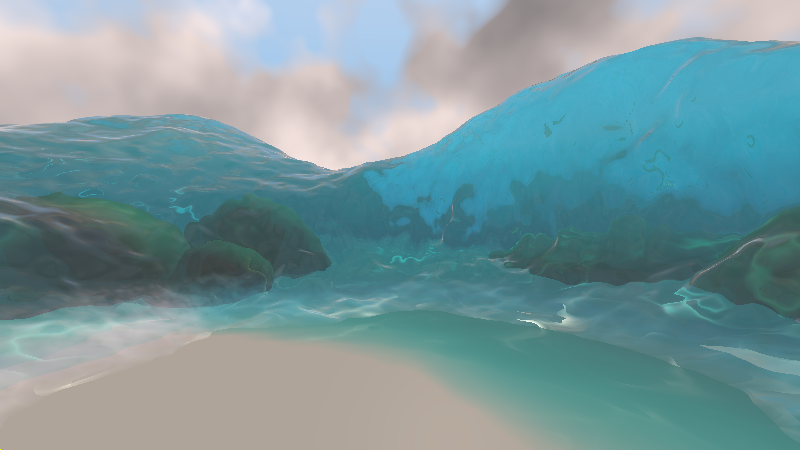
So our water is looking quite bad because it’s opaque! So lets light it as a volumetric, not an opaque. This is done by marching along the water and at each point, marching another ray towards the light to caluclate how much light reaches that point. As I mentioned in the modelling section, we’re already marching ANYWAYS because the water is an SDF so we’re only adding the cost of marching towards the light at each step. This is using the exact same logic I described in an earlier post on volumetric rendering so if you’re interested, check that out for more details. I additionally have it absorb red and green faster than blue which causes things to look more blue the further a ray goes into the volume. I exaggerated the amount of blue tinting the absorption does to more closely match Moana’s art style rather than keeping to what’s “physically based”.
Refraction
Calculating refraction is very easy because both HLSL/GLSL offer an intrinsic that calculates the refraction direction for you. You just need 4 things:
- Incoming view ray direction
- Normal of the volume you’re entering.
- Index of Refraction outside the surface (air == 1.0)
- Index of refraction for the volume you’re entering (water = 1.33) Both the GLSL/HLSL expect the 3 and 4 into a single parameter by dividing the incoming IOR over the outgoing IOR. Here’s how that looks in code:
rayDirection = refract(rayDirection, volumeNormal, AIR_IOR / WaterIor)And remember to flip the IOR values and normals when you’re exiting the volume! With that, the turbulent SDF surface causes a nice distortion of rays that already is starting to look like water!
Reflection
You can’t have water without doing nice reflections! For reflection there’s similarly already a reflect intrinsic in HLSL/GLSL that we can use:
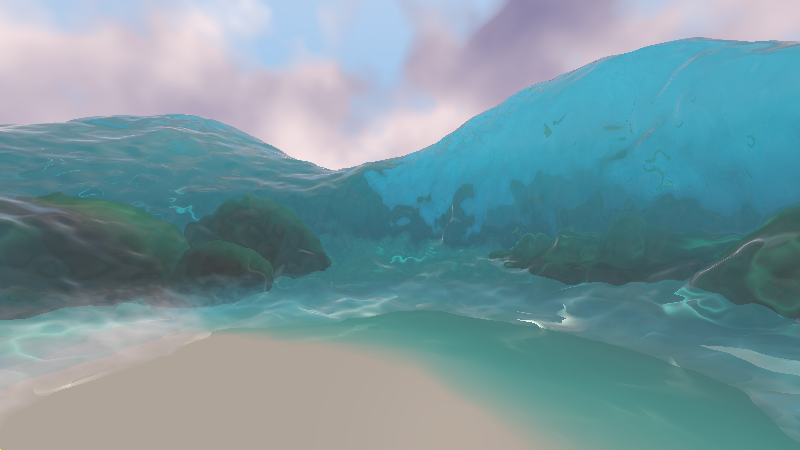
vec3 reflection = reflect( rayDirection, volumeNormal);The reflections add some nice highlights that help bring out the shape of the water, particular at the top where the water is much closer to a grazing angle, here’s how that looks:
Caustics
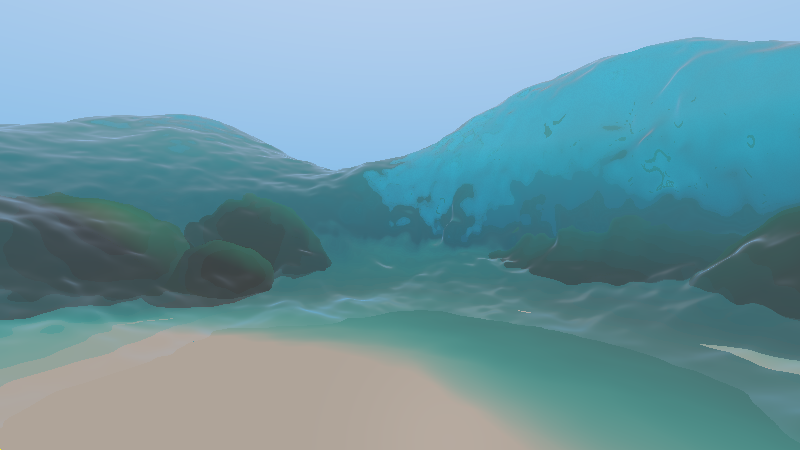
Caustics are really critical to the look of water. They’re also challenging to calculate “properly” and generally out of the realm of real-time. So instead lets think about how to fake them. The intuition I have behind what causes caustics is to think about the hot spot of light you get when you’re using a magnifying glass in the hot sun. The same kind of thing is happening with water due to refraction, only imagine you get the somewhat random shaped magnifying glasses due to the water turbulence/waves.
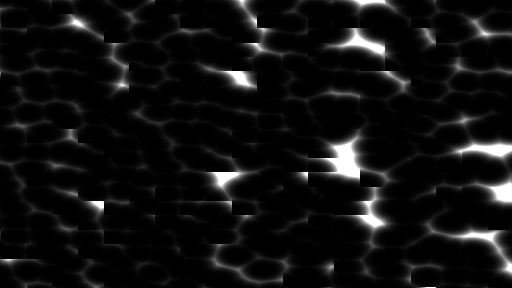
The way I faked it was to take some smooth voronoi noise and distort it. I then use the xz position to read into the procedural caustic texture. It ends up looking okay, there’s some tiling artifacts but I was feeling lazy, so it was good enough for my purposes:
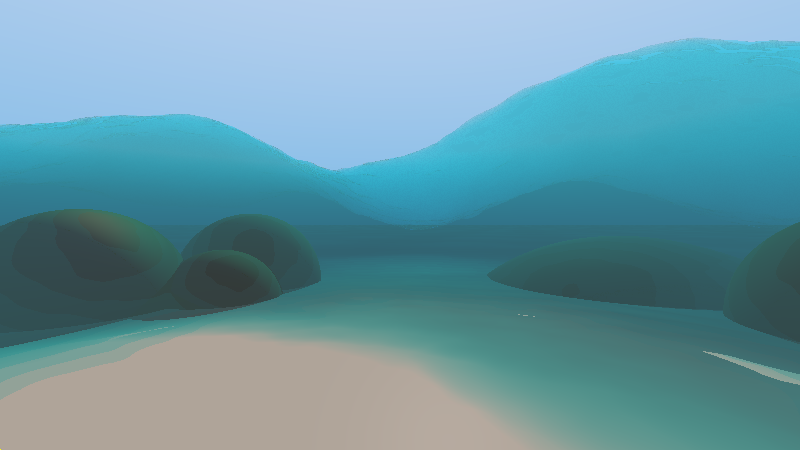
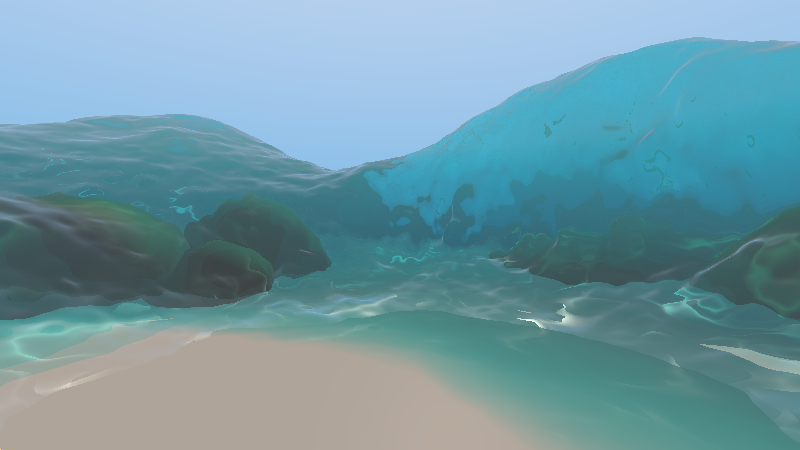
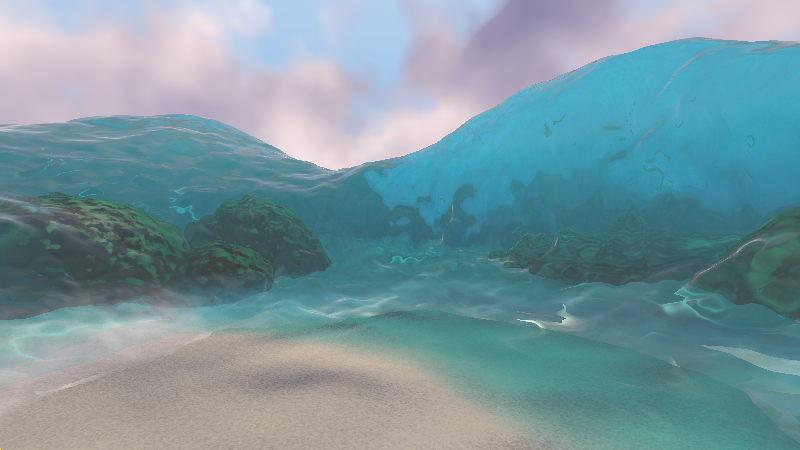
One other approximation when keeping the magnifying glass analogy in mind: we should only really have water caustics where light has passed through water. If it didn’t penetrate any water, then you shouldn’t have concentrated points of light since nothing is bending light around. So when I do my opaque lighting, I only tack on caustics only if the light went through water (and I also weight the amount of caustics applied based on how much water it went through so you get a smooth falloff of the caustics). Putting that all together gets you this:
White water…
I didn’t spend much time making nice white water so I won’t talk about this too much, but I did want to call this out as it’s usually important to making nice looking water.
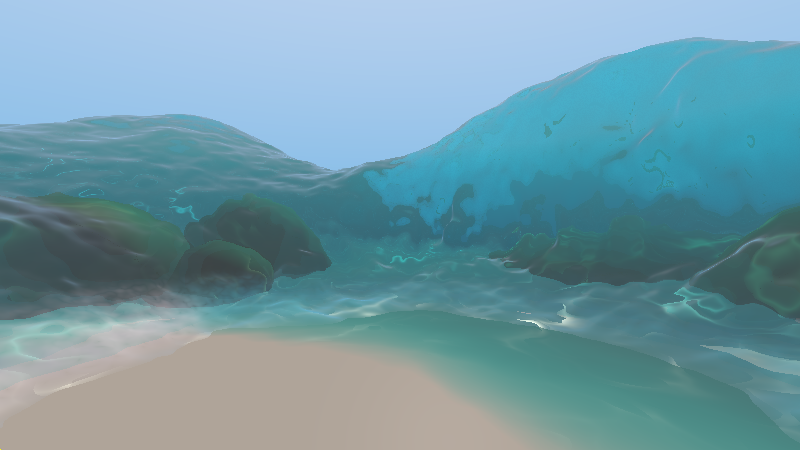
My hacky white water is done when the first ray hits the water and it’s close to the ground, I slap on some noise with white albedo. It’s not particularly compelling but looked better than nothing. Here’s how it looks (it’s hard to see in the water shadow, it’s more apparent in the lighting on the right).
Part 2: Secondary Environment
Sky
For the sky I wanted something fast but also still dynamic. So I a really simple approach of just using fBM noise as my density function and the position is just the ray direction. From there I take a mere 4 ray marched steps towards the directional sun light to calculate some rudimentary self shadowing. With just that it looks pretty decent!
vec4 GetCloudColor(vec3 position)
{
    vec3 cloudAlbedo = vec3(1, 1, 1);
    float cloudAbsorption = 0.6;
    float marchSize = 0.25;
    vec3 lightFactor = vec3(1, 1, 1);
    vec3 marchPosition = position;
    int selfShadowSteps = 4;
    for(int i = 0; i < selfShadowSteps; i++)
    {
        marchPosition += GetSunLightDirection() * marchSize;
        float density = cloudAbsorption * GetCloudDenity(marchPosition);
        lightFactor *= BeerLambert(vec3(density, density, density), marchSize);
    }
    return vec4(cloudAlbedo * (GetSunLightColor() * lightFactor + GetAmbientSkyColor()));
}
However the clouds look pretty monotone. I took a look at some of the shots from Moana and there’s generally this really nice blue backsplash on the clouds that comes from the sky. So to fake that GI, instead of just darkening to gray when light has been self-shadowed by the cloud, I lerp to a dark blue. Here’s how that looks:
Coral
The refractive rippling water already makes the underlying spheres have a semi-interesting silhouette so I just aimed at adding some texture. I ended up just slapping on a procedural normal map based on fBM noise and voilà! We have some cheap, non-terrible looking coral!

Sand
So the “sand” is looking a little flat. Lets see what we can do to add some texture to it! I first attempted to see what we can get from just normal mapping. I started with a height map with high frequency fbm noise to try to simulate the grain texture and then some noise fed into a sine wave to form the dunes. The code was pretty simple
float SandHeightMap(vec3 position)
{
	float sandGrainNoise = 0.1 * fbm(position * 10.0, 2);
	float sandDuneDisplacement = 0.7 * sin(10.0 * fbm_4(10.0 + position / 40.0));
	return sandGrainNoise  + sandDuneDisplacement;
}
And here’s how that looks:
That looks…better? But it’s still looking pretty flat. Hmm, we could try to enchance the geometry to be more interesting but that either involves moving my opaque geometry to be SDFs (which means going down a slower ray marching path) OR trying to make something more compelling using my limitted building blocks of spheres and planes.
A third alternative is to use something very similar to ray marching: parallax occlusion mapping. Parallax occlusion mapping is a technique commonly used in games for faking geometry with a height map on things like low-poly planes that gives the illusion of a much higher fidelity surface.
At this point, you might be asking, isn’t this the same thing as just representing your ground plane as an SDF plane that’s displaced by a height map? In truth, it’s very similar, but the key difference is that parallax occlusion mapping is deferred until lighting and doesn’t affect the geometry. This has 2 benefits:
- Geometry interesection is still really fast ray tracing against a flat plane
- Parallax occlusion mapping is an “optional” part of lighting. I do the parallax occlusion mapping for the first primary ray, but not for reflected rays that hit the sand since the contribution is so small that it’s not noticeble
Since it’s a heightmap AND it’s on a plane that’s aligned to the xz-plane, the code is really simple:
vec3 SandParallaxOcclusionMapping(vec3 position, vec3 view)
{
int pomCount = 6;
float marchSize = 0.3;
for(int i = 0; i < pomCount; i++)
{
if(position.y < GROUND_LEVEL - SandHeightMap(position)) break;
position += view * marchSize;
}
return position;
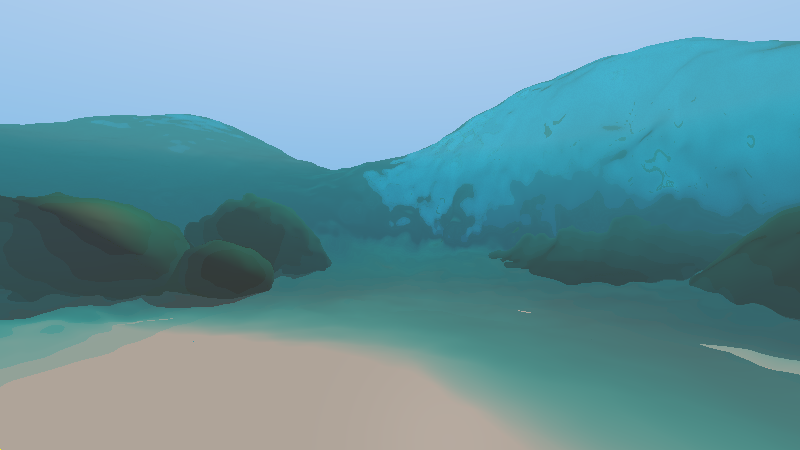
} And here’s how that looks:
Finally, the last touch here is to make the sand look wet when it’s close to the water. Because the water is modelled as an SDF, it’s really easy to query if the water is close by and then make your albedo a little bit darker if it’s close by. I also make the ground reflective here to mimic water built up on the sand, but to keep the reflection calculation cheap, I just assume the ray hits the sky (i.e. I don’t intersect with the water). One other trick is to generate a reflection ray with a normal pointing straight up (i.e. assuming a flat plane) rather than the normal from the sand dunes. This emulates a “puddle” look where water has built up on top of bumpy sand.
Conclusions
And that wraps things up! If you’ve read this far, thanks for bearing with me! I added a bunch of knobs configurable by holding down certain keys that let you play with physical properties such as absorption/turbulence/color/etc. What’s cool when you’ve built things up on top of mostly physically-based principles, things like this generally “just work” and you can get some cool results. So to wrap up, here’s some radioactive jello using the exact same ShaderToy but just with different water properties: